Difference between revisions of "Certificate Services"
| Line 7: | Line 7: | ||
[[File:configure_ad_cs.png]]<br> | [[File:configure_ad_cs.png]]<br> | ||
6. Click next, tick the "Certificate Authority check box, click "next", select "Standalone CA", click "next", ensure that "Root CA" is selected and click "next".<br> | 6. Click next, tick the "Certificate Authority check box, click "next", select "Standalone CA", click "next", ensure that "Root CA" is selected and click "next".<br> | ||
| − | 7. Ensure that "Crete new private key" is selected and click "next" and change the "Key Length" to 4096. | + | 7. Ensure that "Crete new private key" is selected and click "next" and change the "Key Length" to 4096 and click "next". |
Revision as of 20:47, 11 September 2014
Deploying a Standalone Root CA
1. In the Server Manager console, click Add roles and features, then click "next" 3 times.
2. Tick the "Certificate Services" check box. ![]()
3. Click next 3 times then you should see that "Certificate Authority is ticked ![]()
4. Click "next" and then "Install", after the install completes click "Close"
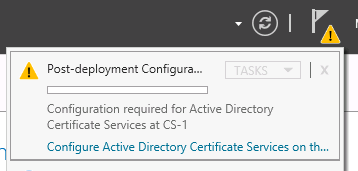
5. On the SErver Manager Dashboard page click the yello triangle at the top right top, and click on "Configure Active Directory Services on the destination server"

6. Click next, tick the "Certificate Authority check box, click "next", select "Standalone CA", click "next", ensure that "Root CA" is selected and click "next".
7. Ensure that "Crete new private key" is selected and click "next" and change the "Key Length" to 4096 and click "next".